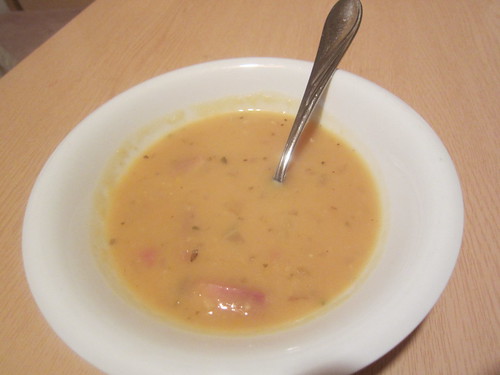
for my birthday this year i made a ham. it was fabulous. of course, the best part is all the delicious left-overs! i made a lot of ham sandwiches, and split pea soup.
i got the ham at costco. it's spiral cut, which is convenient, and has a bone, which is awesome. i'm not entirely sure how to make split pea soup, but this is how i did it:
Split pea soup
1/2 med onion
1 celery stalk
butter (i didn't measure it, i just used enough to saute the onion and celery. maybe 1/8 cup)
2 packages of yellow split peas (from Kaldi Coffee, i want to say they were 100 grams each)
water
ham bone with meat attached
200 - 250g ham
marjoram
sage
thyme
salt
pepper
rinse the split peas gently in a sieve.
chop the onion and celery finely. melt butter in a large pot, then cook the onion and celery until soft. add the split peas then immediately add water, just enough to cover the peas. add the ham bone, and add more water (if needed) to cover the bone. add spices (marjoram, sage and thyme; again i didn't measure, but the marjoram is probably the main spice you want to use, then add a bit of sage and thyme. if you want to measure, start with 1/2 tsp marjoram and 1/4 tsp each of thyme and sage.) add 1/2 teaspoon salt and 1/4 teaspoon pepper. bring to a boil over med-high heat, then cover and reduce to low. simmer until peas are soft. add water if it seems to be getting too thick. the peas will mush up and thicken the soup, but be careful not to add too much water. when the peas are soft, add chopped ham and heat through. season to taste (mainly with salt, but if you feel it could use a bit more marjoram, thyme or sage, add a little, then allow it to simmer a bit longer); remember the ham is salty so you should taste the soup before adding more salt! when the ham is heated through, it's time to enjoy your soup!
Thursday, October 11, 2012
left-overs
Friday, July 2, 2010
Chicken Ramen Salad

I got this 'recipe' from a friend. I guess I've adjusted it a little, but it's a salad so improvisation is usually acceptable. A delicious salad, either as a side dish or even as a main. I made this the other night for the kids' dinner, but they didn't really like the cucumber, lettuce or green pepper. I hope they eventually will like green veggies!
Chicken Ramen Salad
lettuce
tomato
green pepper (and/or yellow and red pepper)
cucumber
carrot
...or any of your favorite vegetables for salad
1 boiled chicken breast, chilled and shredded
1 package chicken ramen
Italian dressing (Pietro brand dressing in Japan)
Basically this is a salad with shredded chicken and crushed chicken ramen. You can crush the ramen in its package, it's not as messy. Pour the salad dressing just before serving, so the ramen is still crunchy when you dig in! My friend who taught me how to make the salad swears by Pietro brand, but I used Good Seasons Italian dressing, and it was just as good.
Monday, March 8, 2010
Beef Stew

I don't think this is really anything new, but I did manage to make a good pot of stew and so I'm sharing. This is my mother's recipe, but I don't know where she got it. It's easy enough to get the ingredients here in Japan, and if you have a couple of hours to spare for making dinner, why not make a pot of stew?
I am calling this beef stew, but I have also made this with pork. Many of our local grocery stores have had big hunks of pork meat (you can also buy some already chopped, mainly intended for curry or Japanese 'stew' (cream stew)), not pork belly, almost like a roast. Very lovely in stew.
I first made my mother's stew several years ago because I once had stew in a restaurant and it had tomatoes in it. Not what I was expecting, and I didn't really like it. I like tomatoes well enough, but I think I was homesick and wanted something with a meatier broth.
Beef Stew
400-500 g beef or pork (momo or roast cut, meant for stew or curry)
1 small onion
1/4 cup flour
salt & pepper
1 Tbsp. vegetable oil
3 or four bullion cubes, beef preferred but any flavor should work
4 cups of water
1 bay leaf
1 carrot
2 or 3 small potatoes ("may queen" is good for prolonged cooking)
Cut meat into bite-sized pieces, perhaps one inch cubes. Cut onions into slices. Put flour into a plastic bag (ziploc bags work well for this) and add salt and pepper (perhaps 1/4 teaspoon salt and a dash of pepper). Put the meat in the bag, close the bag and shake until the meat is covered in flour (if you have a large amount of meat, do this in stages). Heat the oil in a medium-sized pot on high, shake the flour from the meat and place it in the pot. Add onions and cook over high heat until the meat is brown, stirring constantly. Don't worry if the flour sticks to the bottom of the pot, but be careful not to let it burn. When the meat has changed color, add the water and bullion cubes. Carefully scrape off anything stuck to the bottom (the water makes this easy to do). Bring to a boil. Add the bay leaf, reduce heat to low, cover and simmer for at least an hour.
Peel and cut carrot and potatoes into bite-sized pieces, and try to make them all the same size. You can take out the bay leaf now, or after the vegetables are cooked, but don't forget to remove it! Remove lid, increase the heat to high, and add the vegetables. When it comes to a boil, reduce heat to low and cover again. Simmer for 20 to 30 minutes, or until the veggies are soft. Salt and pepper to taste. Serve with warm bread.
For slow cookers:
If you don't have time to wait for a pot of stew to simmer, you can make this in a crock pot in the morning (or even overnight for the next day. Stew is great leftovers!) Still prepare the meat as above, but remove to the crock pot after the meat changes color. Add one cup of water to the pot where you fried your beef and onions and with the heat still on, scrape off the good stuff from the bottom of the pot. Add and dissolve the bullion cubes. Then transfer this broth into the crock pot, just pour it over the meat. Add the chopped veggies (usually vegetables are put under the meat, but the small cut up pieces are going to float around, so don't bother), one more cup of water and the bay leaf. You shouldn't need more water because it's not going to evaporate like a traditional pot of stew, but do taste it before you serve. Cook on low for eight hours, or on high for four. Enjoy!
Thursday, November 26, 2009
Yakibuta in White Sauce
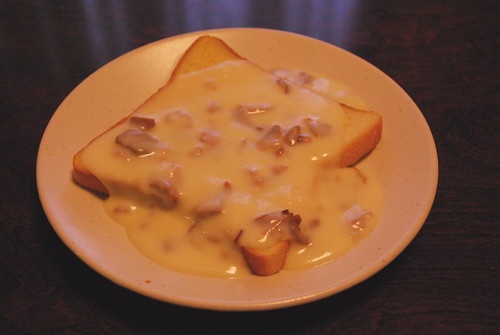
Sorry about not posting as soon as I said I would. I got a bit distracted by Thanksgiving! And today's recipe is not daikon soup nor nabe, but something I whipped up over the weekend, when we had some yakibuta (roasted pork) that needed to be used up. This pork was already sliced and was ready-to-use, and also near it's expiration date, when my husband bought it. I'm not exactly sure what it's for, though I would guess for ramen topping, but I suppose you could also add it to salad or soup. Anyway, I have been a bit homesick and when I saw this, I thought I could try a version of chipped beef on toast. Dried beef is not something I have seen in Japan, but there's plenty of yakibuta around.
Basically, this is just chopped, cooked meat tossed into a white sauce, then served over toasted bread. You can also use cooked hamburger (or, what I usually use here in Japan, a mix of ground beef and ground pork). If you've never made white sauce before, it's pretty easy:
1/4 cup butter
1/4 cup all-purpose flour
1/2 teaspoon salt
warm milk
Melt butter in a medium-sized pot. Add flour and salt, and combine with a whisk. Cook for a minute or so, then add 1/2 cup milk. Whisk continuously to prevent lumps. Add a bit more milk, maybe another cup or so. Stir with the whisk until the mixture starts to boil. You can add more milk, but be careful not to add too much, or it will not be thick enough (or, it will just take longer for it to cook in order to thicken the sauce). When it begins to boil, reduce the heat and simmer as it thickens.
When the white sauce has reached the desired consistency, add the meat, and allow it to warm through. Serve the sauce over toasted bread (I usually use sandwich bread, but any bread will do), or be adventurous and serve it over rice! Season with salt and pepper if desired.
Thursday, November 19, 2009
Update
Well, looks like I'm not doing well on this whole food blogging thing. Goodness. I really meant to post something before now, but I haven't been taking pictures of food recently. I personally like seeing pictures of food on food blogs, so that was my goal for here. However, food here usually disappears before I get a chance to make it pretty and take a picture of it! Plus, it's pretty dark here in my house (especially in the kitchen) so the pictures don't come out well. I am making it my goal, though, to write about daikon soup and nabe. Hopefully I'll have one of those up this weekend.
Friday, August 7, 2009
Sesame Oil
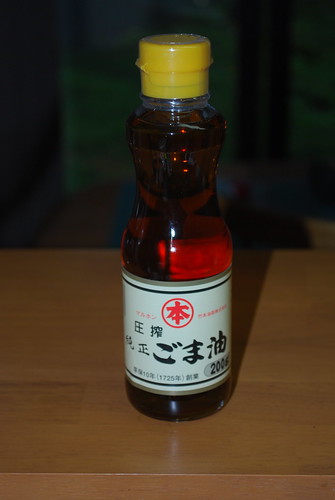
I don't have a recipe to share today. Well, not directly anyway. I thought I'd write about an ingredient today. You know, just to shake things up. Sesame oil, an interesting oil to someone who grew up with vegetable oil (um, that would be me). So, I'm not going to write about the history or the 1001 uses (if there are that many) uses of sesame oil, just write a post about what I use it for and what I think of it.
Let me start of by saying that I don't LOVE sesame oil. In fact, it took me a while to get used to it. It has a strong smell and flavor. Heating the oil really brings out the smell! When I was first pregnant, my husband heated some sesame oil and the smell made me so sick that I couldn't use it again for a very long time! After time, though, I got used to it and do enjoy it from time to time.
The first recipe I used sesame oil was daikon soup. I'll have to share that recipe this winter! I also use it for goya champuru and tonjiru. And recently, I have been using this recipe for all the cucumbers coming out of our garden, yes with a healthy dash of sesame oil. (Thanks to anchan for directing me to the recipe, and thanks to Not Quite Nigella (and her mum) for sharing it!) Speaking of which, I used my pickling dish to make these pickles.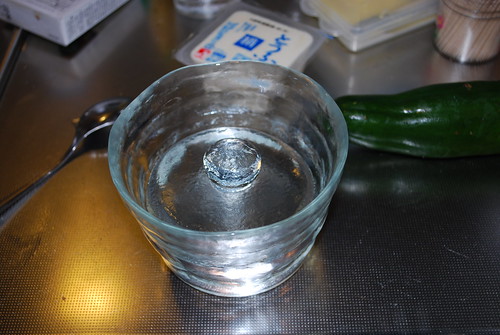
I combined the ingredients in the dish. Then added the cut up cucumber and gave them a stir.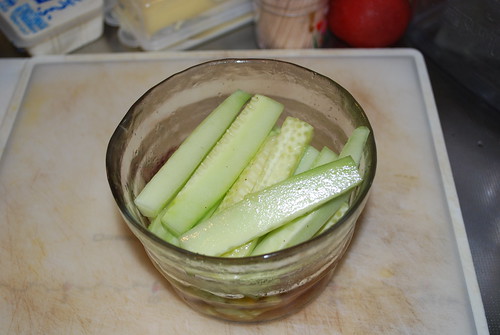
After fifteen minutes (or so) i put the heavy lid on and put it in the refrigerator for an hour.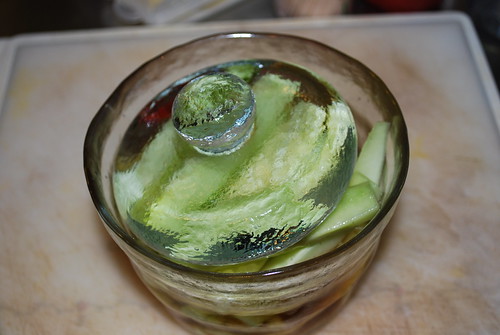
I put a dried pepper in it, but it didn't really make it any spicier. Soaking the pepper, taking out the seeds then cutting it into round slices works much better. My kids don't really like cucumber so I can make this as spicy as I like.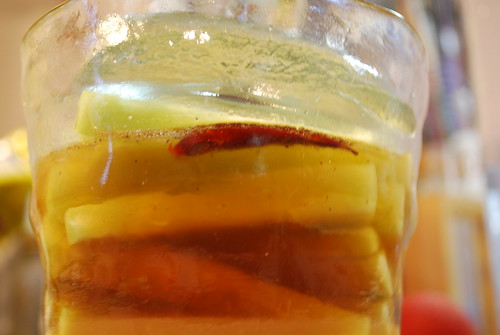
(looks like a little dead fish in there, doesn't it?)
After an hour, the liquid from the cucumbers had combined with the rest of the ingredients and the cucumbers were deliciously pickled. My pickling dish is a little too small for this recipe, but I just kept adding cucumbers as they came out of the garden! Very delicious, even my PIL liked these cucumbers!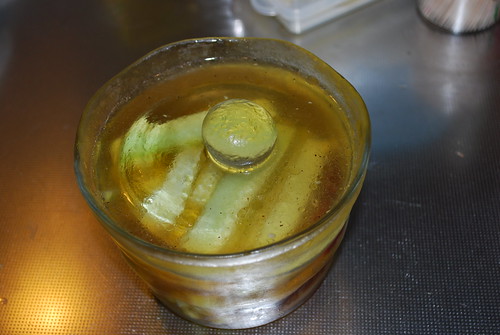
So, don't be afraid to use sesame oil. At the top of this post I have a photo of a 'nice' sesame oil (read: somewhat expensive) but you can find all types of sesame oil with the other oils in your supermarket (in Japan. I'm not sure where you might find it in other countries. Sorry!) Sesame oil is 'goma abura' in Japanese. Get out there and experiment!
Wednesday, July 1, 2009
Simmered Chicken Mini-drumsticks or Wings
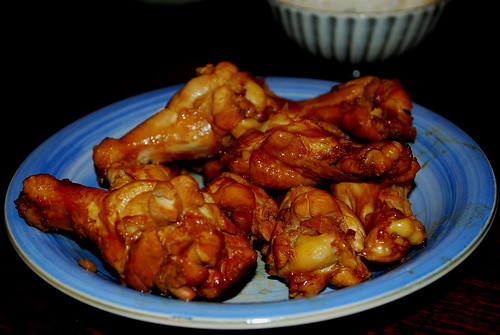
Sorry, I have been slacking off on this blog. I do have some recipes to share, just no pictures or no translations of certain words. Sorry!! Here is one of my favorite summer chicken recipes. This is delicious hot or cold, and terrific with beer! From MIJ, thank you so much!
At first I am going to give metric measurements. I'll try to put conversions up, but in the meantime I suggest using this site (if you don't have metric measuring utensils) to help you out.
Simmered Chicken Mini-drumsticks or Wings
1 kg mini-drumsticks or wings
120 ml mild rice vinegar
25 ml sake
80 ml soy sauce
30 ml water
1-3 garlic cloves
1 bay leaf
red pepper or shichimi togarashi
paprika
sesame seeds for garnish
Place chicken in a bamboo colander. Quickly pour boiling water over chicken and drain (or simply rinse in cold water). Lay chicken in a shallow pan in one or two even layers. Add all other ingredients, and simmer over low heat for 1-2 hours (or as suits you), turning occasionally. Discard bay leaf, pepper and garlic cloves. Serve hot or cold, with a little of the simmering liquid.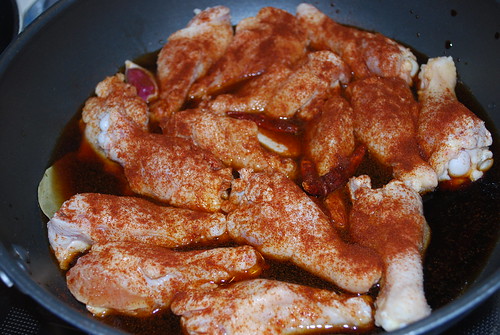
As you can see, I add a LOT of paprika. I love it! It was a bit spicy but even so, my kids loved it! The simmering liquid will most likely gel up when cold, so if you're not serving it hot, be sure to remove the chicken from the liquid.